Wednesday, June 30, 2010

Lace Flower Tutorial

Hey guys! I wanted to show you gals how I made my lace flowers that I used here...


And here...


It all started when I stumbled upon this great stuff at Joann's.


It's called Wright's Flexi-Lace Hem Facing and it comes in LOTS of great colors.  It also comes in two different sizes but I prefer the larger 1 3/4" lace for my flowers.  I originally purchased it to make flower headbands for the new baby but then found myself gluing them to things all around the house.

I did sew these but don't click the red X just yet.... If you have a machine and you can do a straight stitch then these are a piece of cake!  You only need a ruffler foot like mine below.


You can get them at your local sewing machine shop or online.  Just make sure you get one that is compatible with your machine.  It's so super easy.  Just click it on and sew a straight stitch.  It does ALL of the work for you.  You can adjust it to gather as much or as little as you like... Can't beat that!

My first step was to open up my lace and cut it in half.  This left me with 2 strips of lace.  Then, I folded one piece in half like this.


I stuck the folded end into my ruffler and 30 seconds later I had this...


Next, I drew a circle on a piece of matching felt.  This just keeps me from making my flower an odd shape.  The rest is just hot glue! I made a circle on a piece of matching felt.


Starting with the outside of the circle I glued the folded edge down to the felt following the circle.


Once I reached my starting point I just moved to the inside of the first circle and continued gluing.


Once it was all finished it looked like this.


You can stop there or add a super cute button like I did.


I cut the shank off the back of the button using pliers.


Then I hot glued it down to the center of the flower.


Here it is all finished up...


My last step was to cut the felt from under the flower which leaves the back looking like this.


Now all you need is a cute place to attach it.  I added mine to my lamps and wreath but I will also be back to show you how to make SUPER cute headbands for yourself or your little princess.  It's becoming a bit of an obsession I'm affraid :) !  Hope you girls liked it! Let me know if you have any questions and go get yourself a ruffler foot... TODAY!  Happy Wednesday!


~Whitney

 
post signature

Monday, June 28, 2010

Thrifty Window Treatments

Hey guys!  I finally have window treatments in my living room!  It's been a year since we moved in and I am a little embarassed that I have only one room that has window treatments.....make that two now thanks to Whitney:) 

I chose to use the same fabric that I used in my dining room because the rooms are adjoining....and because I LOVE it!  You can get it at Hobby Lobby for $19.99 a yard but we always use 40% off coupons!  Whitney had a great idea to save money on these by using the canvas drop clothes from Lowes.  We needed one for both panels at a price of $13!  After that it was just 1 1/2 yards of fabric for $18.  I saved over $50 in fabric and I love the way the canvas looks. 

Whitney cut the drop cloth in half long ways and sewed the fabric right on top!  Doing this prevents you from having to line the back of the fabric.  I hemmed them myself with an iron and hot glue gun!  I just folded the ends up where I wanted them to hang, ironed a crease and secured with a thin line of hot glue.  I also went back over it with the iron to smooth out the hot glue.

I also installed the hardware on my own.  I used a favorite of ours by Allen & Roth.  You can find this line at Lowes and it has so many different finals, color and accents to customize your window!  It is a bit pricey but with the money I saved from the fabric it wasn't too bad!  I love this sconce in the middle of the two windows.  It allows the poles to meet in the middle without showing a seam!

Once again, I owe a huge thank you to my seamstress sister Whitney!  I couldn't purchase panels this pretty.  She created them and at a very low price!  Now on to the rest of my house....
~Ashley


This post brought to you by Dischangers!


post signature

Wednesday, June 23, 2010

A Lamp for my Little Lady

Once again I spent the day actually getting stuff done.  I put the crib together and got my lamp revamp all finished.  Here is the final result...


This is how I did it.  I started with this lovely lamp that has been sitting on the floor in the corner of my room for over a month... oops :)


After wiping off the dust I taped off the cord and electrical stuff on the top and gave it two good coats of Rust-Oleum Cardinal Red gloss spray paint.  Here it is drying...


Any fellow pregnant spray painters out there?? My hubby bought me this beautiful mask when we found out I was expecting.  It's great! I know it's not the cutest thing but I can't smell the spray paint at all.  I think I will keep using it even after the baby gets here.


While that was drying I started on the shade.  Remember THIS lamp revamp a few months back??

Well, I was actually given two of those shades and I thought the shape would be perfect and girly for her room.  Here is a before shot.


I went into lots of detail on my first lamp post so if you want specifics click HERE.
Here is my shade as I am pulling the new cover over.  I found this great chocolate brown and cream dot quilting fabric at Hobby Lobby that matches the bedding perfectly.


And here it is just before I added the bias tape.


 I added some super cute lace flowers to the front which I will give a tutorial on in my next post.


And here she is all finished up.  What do you think?? I love it in the room.  I probably could  have been a bit more precise with the dots on my bias tape but oh shwell!  Hope you like it!


 Thanks so much for stopping by!!

~Whitney
post signature

Tuesday, June 22, 2010

Peek at the Baby's Room

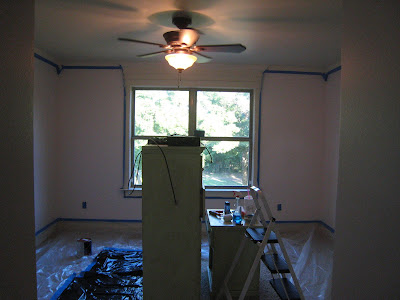
Yeah! I think my "nesting" phase has finally arrived.  I have accomplished more in the last 72 or so hours than I have in the last couple of months.  I just needed a bit of motivation and that came to me through some fabulous baby bedding that Ashley found for her little girl on the way.  I asked her if she would mind me stealing her great idea and of course she had no problem with that.  I will reveal that super cute bedding in a later post.  Today I wanted to show you guys my wall color all finished up and the furniture I revamped.  Here is a shot of the room just before we started painting.


My other amazing pregnant sister offered to come over and paint the other night and I had to take her up on it.  Thanks Squeash!  We taped off all the trim, removed plate covers and put plastic on the carpet.  That furniture in the picture is what I will be using in the baby's room as well.  It started as a pale minty green with pink knobs.  I matched the yellow in the bedding and gave each piece two good coats of paint.  I also wanted an armoire for her room and I had this down in my living room.


I made the mistake of not using primer on this doozie and 5 coats of yellow paint later I am a happy girl...


I would normally sand and glaze almost anything I paint but I really loved the clean and bright look of these just like they were.  I found some great red knobs at Hobby Lobby for $2 a piece... Woohoo!  I think they tie each piece together so well and I love the outcome! Wait until you see it with the bedding!!


Here is her bedside table... Love!  The blue wall color I went with is a Valspar paint.  I love the way it painted on but I didn't love the new $32 price tag per gallon they have put on their paint.  This is the first time I rolled my pieces rather than using a brush on everything.  Because I was painting 4 different pieces I thought it might go a bit faster and it so did!  I used a 4" foam roller like this one and cut in with an angle brush.


Here is her dresser...


A close up of the knobs...


And one more corner shot for fun :)


I just love it!  I can't wait to show you more.  Thanks again Ashley for the fab bedding idea and for the inspiration that I needed to finally get moving!!

~Whitney
post signature

Saturday, June 19, 2010

The Power of Patience!

I really should title this 'The Power of Patience and a VERY Talented Sister'!  So, a year ago I found this so, so, so cute quilt on PBTeen at a great clearance price.  I fell in love and knew it was the perfect quilt for my oldest son.  Only problem was that the matching shams were sold out (even on Ebay!).  I bought it anyway knowing that I could find a fabric or shams in the near future.  Well let me tell you I have been looking everywhere for the perfect brown shams to match and they were either too shiney, too expensive or too feminine and the same was true with the fabric. 
Fast forward to a shopping trip with Whit today and I had a lightbulb moment!  We found the perfect chocolate corduroy at a perfect price!  With our 50% off coupon we snagged it up for $3 per yard and we only needed 2.5 yards!

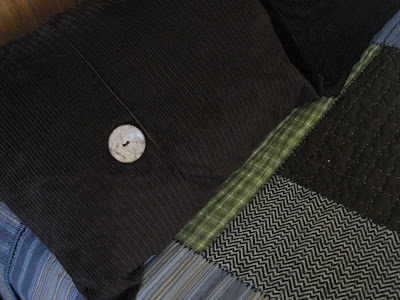
Buttons were 1/2 off at Jo-Ann's as well so we added these super cute coconut buttons for under $2 each!

My part in this was over the minute we walked out of the store.   Whitney cut/sewed/surged quickly and had these done in minutes!  She made these pillows the same way she made her Pottery Barn Inspired Pillows and shared her tutorial with us HERE!  I love how the tan corduroy looks with the chocolate corduroy on the shams!

A custom look that I wouldn't get with the matching shams!


$7 for the fabric, $4 for the buttons and I would have spent $50 on the shams at Pottery Barn!  More money left over to craft with:)  Thanks Whit I owe you:)))
~Ashley

Stop by Madison Reece Designs on Etsy!!!


post signature
 
Designed by Deluxe Designs