


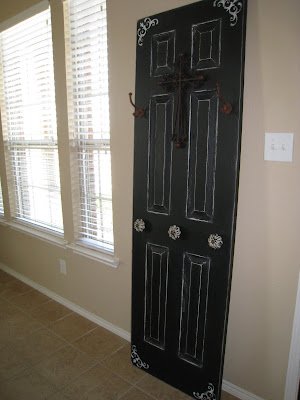
It started with a standard, white, 24 inch, 6-panel interior door that I purchased at Lowe’s for $19, a bucket of Behr Black/Black interior eggshell paint and a brush. I headed over to Whitney’s house for our craft night and began my work!

I painted two coats of the Black/Black eggshell on one side of the door and the edges. It dried pretty fast and I was so pleased it only needed two coats! I then used a stencil that Whitney had made from the Cricut and sponged Antique White acrylic on the corners. I added two hooks and a cross that Whitney had at her house (it really made a nice touch, I think). Next, I added 3 large knobs that I purchased at Hobby Lobby and it was time to distress! I used a 3M sanding block (my favorite tool to sand with) with 80 grit paper and distressed every edge and corner (I love distressing). I love how the white came through when I distressed it! That was it and I now have a super cute Faux Hall Tree in my dining/entry way. I just leaned it up against the wall and it is surprisingly sturdy and I love the way it looks! Total cost ~ $28 ~ Enjoy!


I will be posting this at A Soft Place to Land for DIY Day... Check it out... Lots of great ideas there!!


22 comments:
This is beautiful! I might have to copy this one!
How creative, it's beautiful! I love the distressed look and the crystal knobs.
Love this piece...great job!
How creative! It would have to be bolted to the wall at my house...kids would surely knock it over.
you know what would look really SWEET? if you took this one step further, say did one more door, not necessarily the same exact way but maybe slightly different - like different hardware, different positions of stencils etc - then literally MOUNT them on your entry wall - think it would look really cool actually hanging on the wall - and if there was more than one, then it would look like panels....
That is soooo flippin' cute! Love it!
Thank you so much for the comments girls! ~Ashley~
Really cute and stylish! I will be coping this soon!
XOXO-
oooh-it's fantastic! I love using doors as decor!
Very cute! I love the knobs, and the hooks you chose. :) I'll have to save this project in my "files." Visiting from Kimba's party! :)
Wow! Very creative - you did a great job!
Very cute! Love the finish!
It really did turn out great and functional too, killer combo! I just know my kids would try to "open" this door, don't invite us over :)
What an amazing idea- it turned out great! Good job.
Great idea!!! Turned out fabulous!!!
Super cute. I almost typed Cuper Sute but caught it. Love the way it looks with the distressed/sanded edges.
Awesome!! Would love to try this!!
Oh how cute! I LOVE the knobs!
Way cool! I love this idea.
Yay! You are the winner! Fabulous project. Please email me with your color choice - Siena (red and yellows) and Provence (greens and blues). I also need your name, address, and phone number. Congratulations again!!!
What a great project. CONGRATS.
Cheri
Its So Very Cheri
omgosh! that is so cute! i just scored a free door...i feel inspired!
Post a Comment