Sunday, August 30, 2009

Whitney's Shower Curtain ~ Drab to Fab!!!

I am learning quickly that blogging is encouraging me to get my projects done. My latest project is one I have been putting off since we moved in. I haven’t shared many sewing projects yet so I decided to finish this one… finally… and share. When we built the house I decided to go with shower curtains rather than glass doors in the kids’ bathrooms. They are easier to clean and I like being able to bring in color with the fabric for the curtains. The only negative to shower curtains is the hardware up top. I know they make lots of cute knobs and rods and all that good stuff but I just assume cover it all… I’m not a huge fan. Here’s what she looked like before…


I decided to make a small valance and put it on a separate rod just above the one that is already hanging. My girls are 5 and 6 so I wanted to do something fun but also something that I can live with. I found a cute remnant at Hancock’s and got to work. These are so simple to make. You can even do them with fabric glue or hot glue if you don’t sew… I won’t go into detailed instructions here but if you want some advice on making your own just let me know. I would be happy to pass on some easy tips. I am excited to get this project finished because I now finally get to accessorize… more of that to come! Thanks for stopping by! I will be posting this over at Met Monday over at Between Naps on the Porch… Check it out and be inspired! http://betweennapsontheporch.blogspot.com/2009/08/welcome-to-33rd-metamorphosis-monday.html


Ashley's Wonderful Whatnot ~ Cracked Vase rehab

Hi all! My Wonderful Whatnot for the day is my cracked Hobby Lobby vase! I watched Whitney’s kid’s while she ran to Hobby Lobby. She promised to bring me back something shanty and she did just that! She came home with a metal/glass vase that had a huge piece missing…fortunately for me she still had the piece that broke off. She purchased it for $5!!!! I super glued the piece back in place, painted it with the Antique White Acrylic and Glazed it with the Ralph Lauren Smoke Glaze (of course). I then found a box of cute little green apples for $6 at Home Goods and voila! I placed it on the top of my hutch (crack to the back of course) and I just love how the green stands out! Enjoy!


I will be posting this at The inspired room for Fall Nesting at http://theinspiredroom.net/2009/09/01/get-inspired-for-fall-fall-nesting-2009/ Check it out and be inspired!

Saturday, August 29, 2009

My Ballard Inspired Pears ~ Whitney's Weekend Whatnot

So I had another lucky day at Home Goods… LOVE that store. Like many of you, I too have been eyeing those Ballard pears and wanting some of my own. I wasn’t able to find an exact match but I do love my new wannabes! I found the 2 smaller ones for $3.99 a piece and the larger one for $6.99. The two smaller ones were in terrible shape so I thought I would be able to bargain a cheaper price. I was told that this is “what they are supposed to look like”. I held back a laugh of disbelief and purchased them at regular price… $3.99 is still good and OF COURSE I will be painting them!


This makeover was simple. I covered the metal stems and leaves with tape and then spray painted all three with Valspar Vanilla Satin. I did like the color of the larger pear but I wanted a cohesive look which is why I painted all three. I love white Ghost pumpkins and I felt like painting these all white would give me a similar look. I considered glazing… I may still, but I want to stare at these a bit like this before I make my decision. Their new home is in my kitchen counter between my stove and fridge. Love them! Thanks for stopping by and checking out my latest shanty turned chic! I will be posting my pears over at Southern Hospitality for her Thrifty Finds. Check it out girls...
I will also be posting these cuties over at The Inspired Room for Fall Nesting... Check it out!

Wednesday, August 26, 2009

Whitney's Wall Art Makeover!

On to my latest shanty… I made a trip to Hobby Lobby last week while Ashley kept all 5 of our kids. It was so nice to walk through the store without listening to screaming… or having to scream myself. I was able to find lots of goodies but this one had to be the day’s favorite. It was a large square piece of art for the wall. The picture can sum up how it landed itself on the clearance aisle. It was originally $59 and was on clearance for $6. I liked the idea of it and the design that was etched in the wood but the colors were terrible! I knew it would be blah hanging by itself so I found a $.99 wood oval and a $2 hook to dress it up. Here’s what I did…


I spray painted the art and the little oval with Valspar Vanilla satin paint. After letting that dry I moved on to step 2… For those of you that follow us you are probably well aware of what that step was. I glazed both pieces with Ralph Lauren Smoke Glaze. A few tips on glazing from my experience…

~You must let your base coat dry really well. If you are using acrylic paint or spray paint that is usually only an hour or two. If you are using latex paint you should wait at least 12-24 hours.
~Your base coat needs to be at least an eggshell but I would recommend semi gloss or satin for a smoother finish.
~Once you have painted and wiped the glaze off, you can’t go back over it. It has a glue base and will pull all of your previous glaze off and you will then be angry…trust me.
My final step was assembly… I attached the cute little knob to the wood oval and added a picture hook to the back. I then used a scrap of fabric from an old shirt to make a tie… stapled the ends to the back of the square and hung it on the wall. I am so pleased with the outcome. This little shanty cleaned up well.


Ashley's Wonderful Whatnot ~ Bathroom Accessory

So, I have slowly been decorating the boy’s bathroom in a mature, rustic/cowboy theme. The towel bar was the last addition to the bathroom and that was some time ago so I decided that I needed to address their bathroom once again. I just wanted something cute and colorful to put on their counter tops and the idea went from there.

I bought 3 mason jars from Michaels at $1.27 each (I later found a set of 12 at Wal-Mart for $7 FYI) and that was the only purchase for this project…not bad! I decided to put bathroom necessities in the mason jars (q-tips, cotton balls, etc.) I liked Whitney’s idea on her dining room table to use the picture frame as a tray so I found a frame in my closet and began piecing everything together.


I painted the rims on the tops of the jars with Burnt Umber Acrylic (2 coats) and I painted the frame with Antique White Acrylic (2 coats) and glazed with the Ralph Lauren Smoke Glaze. While the paint was drying I cut three circles out of a cute piece of scrapbook paper to fit the tops of the jars and I cut down a coordinating piece to fit in the frame (I did not use the glass on the frame). I filled each jar with necessities and when all was said and done I had a cute accessory for the bathroom counter that is also functional ~ As always ~ Enjoy!


I will be posting this at A Soft Place to Land for DIY Day... Check it out... Lots of great ideas there!! http://asoftplacetoland-kimba.blogspot.com/2009/08/diy-day_26.html?

Ashley's Faux Hall Tree

Hi all! It’s back to school week and although I miss my boys dearly I now have more time for projects! The project I’m sharing today is my Faux Hall Tree. I have wanted a hall tree for my entry/dining room since we moved into our new house. I scoured Craigslist daily but could not find one at a price I liked so I decided to make my own!

It started with a standard, white, 24 inch, 6-panel interior door that I purchased at Lowe’s for $19, a bucket of Behr Black/Black interior eggshell paint and a brush. I headed over to Whitney’s house for our craft night and began my work!
I painted two coats of the Black/Black eggshell on one side of the door and the edges. It dried pretty fast and I was so pleased it only needed two coats! I then used a stencil that Whitney had made from the Cricut and sponged Antique White acrylic on the corners. I added two hooks and a cross that Whitney had at her house (it really made a nice touch, I think). Next, I added 3 large knobs that I purchased at Hobby Lobby and it was time to distress! I used a 3M sanding block (my favorite tool to sand with) with 80 grit paper and distressed every edge and corner (I love distressing). I love how the white came through when I distressed it! That was it and I now have a super cute Faux Hall Tree in my dining/entry way. I just leaned it up against the wall and it is surprisingly sturdy and I love the way it looks! Total cost ~ $28 ~ Enjoy!


I will be posting this at A Soft Place to Land for DIY Day... Check it out... Lots of great ideas there!!

Sunday, August 23, 2009

Whitney's Mantle Makeover!!!

I had stared at it long enough… It was time to make some decisions. When we finished our home a few months back my kitchen mantle was one of my favorite places. I don’t have a mantle in any of my other rooms so I knew that I wanted one over my stove. I love it… just couldn’t decide what was worthy enough to sit up there… didn’t want anything that might hinder that love, you know??

I decorated the entire mantle for under $40… thank you Hobby Lobby. I bought an open back frame for $15, and baroque mirror for $7, the big once gold “G” for $5, a grapevine wreath for $4, a clearance garden finial for $2 and a few deco balls at under $5 to finish it off. The gold “G”(my last name initial) was painted as soon as I made it home with Folkart Seamist and everything else was ready to go. I am sure I may get an itch to paint some of these down the road but for now I am happy. It added a bit of color to my kitchen and now when my friends come visit they can quit telling me that I need to put something up there… thank you girls. Thanks for stopping by! I will be posting this blog over at Twice Remembered for Kim’s Make Your Monday. Check it out…Lots of great ideas there!! http://twiceremembered.blogspot.com/2009/08/make-your-monday-week-five-add-your.html

Ashley's Wonderful Whatnot ~ Clock Transformation

Hi all! I haven’t posted any projects this past week ~ to say it has been a crazy week would be an understatement ~ but, on with the projects! My newest Wonderful Whatnot is my clock transformation! I was inspired by the clock that Kim did on her blog Twice Remembered! Her clock transformation turned out so wonderful that it inspired me to transform my own!


It started out as an average (as my cousin Jennifer would say) “commercial” brown clock. It was pretty but not exciting so I had to spice it up a little!

I painted 2 coats of the Antique White acrylic, let that dry and then glazed it with the Ralph Lauren Smoke Glaze. I cut a circle the size of the face of the clock with a cute piece of scrapbook paper I had to cover the face of the clock. I then disassembled the clock (hoping I would be able to get it back together again), punched a hole through the front of the “new face” with a pin (punching the hole through the print side of the paper makes for a smooth hole on the front side) and reassembled the clock. This was a very quick project and I love the completed transformation! Enjoy! I will be posting this at Make Your Monday over at Twice Remembered... Check it out!!! http://twiceremembered.blogspot.com/2009/08/make-your-monday-week-five-add-your.html


Saturday, August 22, 2009

Whitney's Pressed Tin Makeover ~ A Weekend Whatnot

Good Morning! My youngest sister is getting married today. It has been a crazy weekend already but I did manage to squeeze in a small blog… another whatnot that is. I have had this piece of pressed tin I bought at Hobby Lobby about a year ago sitting in my daughter’s room. It was $7 on sale which makes it a very thrifty whatnot. This piece of tin has definitely joined my “dark and boring” list… it was time to revamp!


I used a foam brush to paint on 2 coats of a favorite acrylic paint…Folkart Seamist 2486. After letting that dry, I used my 80 grit block sander to strip the paint on all the detail. It actually took of the original color as well and exposed the silver of the tin… LOVE it! Last, I used my Ralph Lauren Smoke Glaze on the entire piece. You just paint it on and wipe it off. I instantly turned my dull and boring tin into a super cute piece that has found it’s new home above my pantry in the kitchen. Thanks for stopping by and have a great weekend!! ~Whitney


I will be posting this over at Shabby Chic Cottage for Transformation Thursday...Go check it out... Lots of smart ladies there!! http://www.theshabbychiccottage.net/2009/08/tealight-tray-tutorial.html?

Wednesday, August 19, 2009

Whitney's Roman Shades

UPDATE!!

I will be joining Donna over at Funky Junk Interiors for her Saturday Nite Special! Scroll down for the button!

So I am so excited to share my next project with you… I mentioned that we finished building our home about 6 months ago. One of my favorite details of my home is the trim work. My super handy stepdad did all of the trim. I will share more detailed pictures of that in a separate blog. When thinking about window coverings, I was at first totally sold on shutters. I love the look from the outside and they are easy to maintain and all of that stuff. We put off the purchase of these because of cost and about a month after living in our house my mind started changing. I knew I wanted something that would show off and compliment all his work and not take away from it. I love natural light and I felt that shutters would cut that in half at least. I also love the look of my windows open and the shutters would cover that up as well. I started entertaining the idea of roman shades and decided to google. That’s when I stumbled upon this treasure…http://www.terrelldesigns.com/howto-videoclips.htm

I found a series of tutorials on making your own roman shades. I am a visual learner so I decided to give it a try. After watching them I decided that I could for sure make my own. I won’t repeat the directions that she gives but I will tell you to check it out. These require minimal sewing ability and they are super quick and cheap to make. I will offer my own advice from now making several of my own.

~ I used eye hooks rather than the pulleys and locking pulleys that she uses. They are much cheaper and a heck of a lot easier to find. Just drill a pilot hole and twist it in.
~ I skip the Velcro all-together. I just made my shades about 2 inches longer than her pattern, wrapped it around my 1x2 and stapled it. I think this is a much cleaner look.
~ I use a fan/light pull at the end of my cords… much cuter than that plastic thing.

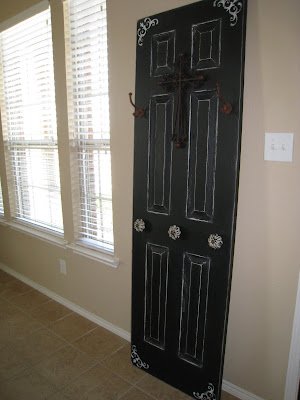
I was so pleased with the outcome. They are easy to use and I feel that they totally compliment my trim which was a main focus. I did add some small scrolls from Hobby Lobby to my living room shades just to give them a little more pop. I just attached a nail to the 1x2 from the shade and hung it up. The best part of this project… the $ I saved. These cost a fraction of the price of the shutters. Thanks so much for stopping by! I will be posting this with Kimba over at A Soft Place To Land for DIY Day. Check it out... Lot's of talent there...http://asoftplacetoland-kimba.blogspot.com/2009/08/diy-day_19.html


Funky Junk's Saturday Nite Special

Whitney's Revamped Vase ~ A Wonderful Whatnot

I had good intentions of sharing some of my larger projects this morning but decided to go with another whatnot… I love how this little one turned out! Ashley and I were rummaging HomeGoods last week. That’s where she landed her super cute tea set for nothing. I was checking out the garden section when I stumbled upon this little shanty… I am certain it’s wonderful color of “not quite terracotta” is what landed on the clearance aisle for $7. Lucky me! I love the shape of it and the detailing on the sides, and of course everything looks good painted so….
I used my Valspar Vanilla Satin spray on it as soon as I made it home. After letting that dry I used my Ralph Lauren Smoke Glaze on the whole thing. AGAIN… did I mention how much we love this stuff? It is a staple for Shanty2Chic! It’s so easy… you just paint it on and wipe it off and you’re done. Love it. I had some extra dried hydrangea that I filled it with and I was done. My new little pot has a home on my serving bar in the kitchen. I walk past it and smile often… Thanks for stopping by! I will be posting this over at The Shabby Chic Cottage for Transformation Thursday... Check it out! http://www.theshabbychiccottage.net/2009/08/welcome-once-again-to-transformation.html


Monday, August 17, 2009

Ashley's Tea Set ~ A Thrifty Find!

Latest thrifty find: A cute tea set! I have recently redone a hutch for my dining room and I have been trying to find nick knacks to decorate it with on a budget and it has been so fun! Whitney and I went out and about in search of bargains on Saturday and we ran into a store called Home Goods (it's a TJ Maxx store). It has the most wonderful bargains! I found this great Tea Set and decided on a few pieces I couldn't live without! I payed $18 for all 4 pieces total and I could not be happier. I will be posting this whatnot with Rhoda’s Thrifty Finds over at Southern Hospitality. Check it out… http://southernhospitalityblog.com/those-thrifty-finds/

Ashley's Candle Holder Redo ~ A Wonderful Whatnot

My latest Wonderful Whatnot turned out to be a favorite of mine! I now have an obsession with painting everything insight! As I walk around my house something catches my eye and I am immediately on a mission to paint it! That’s where the story starts with my candle holders. They were just the basic gold cross candle holders…very commercial! I wanted to customize them right away!
I painted them with the same Antique White acrylic I have been using and glazed them with the Ralph Lauren Smoke Glaze that Whitney owns (next can is on me ~ seeing how we use it every day!) That was pretty much it as far as the candle holders go. I love the way the glaze caught the detail in the crosses!
I couldn’t put any candle on these (that would be so commercial). So, I found some super cheap candles at Hobby Lobby and painted them with Behr Bison Brown eggshell and wrapped cheetah print ribbon around each one! I love the look of the candle holders and the candles now and they are so original and inexpensive! What a transformation ~ Enjoy! I will also be posting this whatnot on Met Monday over at Between Naps on the Porch... You can check it out here! http://betweennapsontheporch.blogspot.com/2009/08/welcome-to-31st-metamorphosis-monday.html

Whitney's Wonderful Whatnot~ Thrifty Birdhouse

So my latest whatnot… this AMAZING birdcage planter. Ashley and I were out running errands on Saturday. I mentioned that I needed to run into Lowe’s and get some spray paint. I left her in the car with the kids and ran in to get only what I was going for. That was until Lowe’s put their clearance section within a few feet of the paint aisles… I was unable to maintain self control and had to go “peek”. So glad I did!! What I found was a super cute metal indoor/outdoor birdcage planter reduced to $20. Normally I don’t buy anything that is not a shanty project but this I couldn’t turn down. I may someday use it for it’s intended purpose but as for now it will be in my dining room as an accent table. You can imagine Ashley’s face as I am walking back to the car with a 4ft bird cage… I can’t say it was a face of surprise! I will be posting this whatnot with Rhoda’s Thrifty Finds over at Southern Hospitality. Check it out… LOTS of goodies there! http://southernhospitalityblog.com/those-thrifty-finds/


Designed by Deluxe Designs