Wednesday, June 16, 2010

Kara's Party Ideas

With summer here I think about parties!  The Fourth is always a time to party and both of my boys are summer birthdays so I am always stuck with the age-old decision....'What should I do for their party'.  Having their party in the summer we always end up at the pool but I have never been very creative with the actual party idea.  This is why I am so excited about Kara's Party Ideas! 


She has sooooooo many party ideas, how-to's and downloads that will give you inspiration and direction for your next big shin dig!

Turn your ordinary 4th BBQ into a jaw-dropping ensemble kids and adults will LOVE!


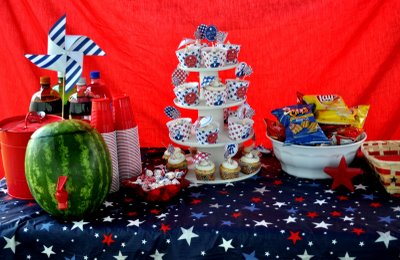
Super cute and easy cupcakes!

Love this idea for a drink dispenser!  It's a realy watermelon!

So creative!  Kara used the snack boxes in the party pack as hamburger holders!

What a great desert idea!  Cake and brownie shish kabobs!

Kara also shares a lot of her favorite parties she has come across!

Like this adorable summer themed party!  Can't believe the detail in this party!

I went crazy over her Girls Night Out party ideas!


I could go on and on!  You really need to check it out yourself!  Kara's site is so easy to search and there are ideas for everyone and every party!  This site has really made me want to turn my parties up a notch or two!  I'm giving it a try this summer!


post signature

Tuesday, June 15, 2010

Party Highlights!!

Hey guys!  Hope you all had a great weekend!  I had the in-laws in town for my 3D Sonogram so I stayed pretty busy.  Thanks to all of you gals who linked up to the party.  Before I announce the winner of our Flirty Aprons giveaway I wanted to highlight a few of our favorites!


We loved this amazing plate rack from My Repurposed Life!!


Check out this amazing desk makeover at I Heart Naptime!


LOVE the touch of scrapbook paper on this one at The Painted Cupboard!


This is one of my favorite blog projects ever from Donna over at Funky Junk!!


I thought this was so cute over at Paper Princess!!


I want this pillow at Just Another Hangup!!

How fun was that!!  All of you girls had amazing projects and I love looking at them and getting inspired to get off my rear :)

Now for the winner of a super cute apron from Flirty Aprons...

It was #62... Judy at In His Grip!

Congrats Judy! Send us an email with your contact info and we will get it over to Flirty Aprons!

Thanks so much again girls and we will be back very soon!!


post signature

Wednesday, June 9, 2010

Girl or Boy???

So...... We found out that we are having a GIRL!

We wanted to share the news with our family in a creative way that our boys would enjoy being a part of so...

I found a recipe for cream filled cupcakes HERE!

I filled 4 dozen (box recipe) cupcakes with pink icing and we delivered them to our friends and family.  It was so fun to watch them bite into the cupcakes (and scream).  Such a great memory and the boys loved delivering the cupcakes!  They were super easy and delicious!

So excited to have our first girl after 2 boys and it has been so fun already making "girl stuff" with Whitney and Leasha!  Our sister Kyndra also had a girl last November so within 1 year we will have 4 new girls in the family!

Check back soon for the winner of the 'I Made It Without My Hubby' Link Party and Giveaway.  If you haven't entered it's not too late.  Scroll down to enter.

In the meantime check out Kara's Party Ideas to get your creative juices flowing for your next party!

~Ashley
post signature

Sunday, June 6, 2010

It's that time again girls!! We want to see all of your latest revamps, projects and crafts you have done without the help of your man!!

Every entry in this month's party will be in the drawing for a fab apron from the super cute


Flirty Aprons


You will only be considered for the drawing if you add the party button to either your post or your sidebar.  Here it is and you can find it on our sidebar!

Shanty2Chic


As always we will be highlighting a few of our favorites!
Let's have some fun!! We can't wait to see what you gals have in store!!

Just click on the link below to add your post link!

Link up ladies!!


post signature

Thursday, June 3, 2010

Flirty and FUN... And a GIVEAWAY!!

You girlies have to go check out one of the Shanty Sister's new favs!!!

Flirty Aprons


Flirty Aprons is the internet's #1 selling apron!  They are soooo darn cute ladies!  Here are just a few of their cuties!!


These are so darn cute! They won't fade or tear, one size fits all and they offer a 30 day money-back guarantee!!

Check out their kids aprons!!


Too cute!!

They are also offering a coupon code discount to all of the Shanty readers!  Here it is...

FA202010

And some more fun news...

I Made it Without My Hubby is coming up on the 7th of June!!  We love party days!!

As always we will highlight a few of our favs and we will draw from ALL of our participants to win a super cute apron from Flirty Aprons!!!  How fun is that!!??  So make sure you get your projects, crafts and posts ready to enter for this awesome giveaway!!

Make sure you go check out all the goodies at Flirty Aprons!!  These really are the cutest aprons ever and they are perfect for crafting and cooking both!!

Flirty Aprons


post signature

Monday, May 31, 2010

Flat Folded Rosettes & A Lamp Shade

Happy Memorial Day!  I'm back with my second of three tutorials on fabric flowers.  These will be the folded rosettes I used on my wreath.


Here we go!

I started by cutting a 3" strip of fabric.  I used a blue linen from Hobby Lobby for these and I love the thickness of it.


I cut that strip in half which gave me two 3" strips.  This will be enough for 2 rosettes.

I ironed one of my strips in half.


After ironing it in half I opened it up and ironed each side to the center line... Just like bias tape.


And the other side...


Now I folded the strip in half to form my tape.


I ironed that down to hold everything in place.

Next, you will need a piece of felt as your backing.  I just used some extra cream felt I had.


I started by rolling one end of my fabric two times like this.


I put a large dab of hot glue on my felt and pressed the roll down until it was dry.


Now it's time to roll and fold.  I will do my best to explain this... It's super easy!

I just wrapped a little bit of the fabric around the roll I had already glued down and then fold the fabric down and to the outside of the center roll.  I dabbed some hot glue behind it to hold everything in place. 


Then you literally just repeat this step over and over.  There is no science to the spacing.  I just eyeballed it and I would add a fold as I thought it looked best.


Every time I folded I would add a dab of hot glue under it to hold it in place.


Just remember... The top of your fabric piece will go out and down with every fold.


The flatter you glue it down the wider and more open your rosette will be.


Once you have come to the end of your fabric strip leave about an inch or so and cut your felt around the bottom of the rosette.  Wrap the extra piece to the back and hot glue it like this.


Here they are finished but missing a little something...


Some cute buttons I hot glued to finish them off...


How easy was that??  Want to see where I put mine??  Remember my lamp shade makeover a while back?  Well, I thought it was looking a bit naked.


Ooh... I love these! I could put them everywhere... And I probably will :)

Thanks so much for stopping by guys!! Let me know if you have any questions and have a great week!!

Don't forget I Made it Without My Hubby is coming up on the 7th.  We have a super fun giveaway for the winner so get those crafts and projects ready ladies!!


~Whitney

 
post signature
 
Designed by Deluxe Designs