Oh HEY!!! You were not forgotten, I promise! Ash and I have been crazy busy this weekend. Ashley is my daughter's cheerleading coach. Here they are with my other sister who also coaches her.
This last weekend we competed at Nationals and guess what...
Woohoo!! So... Needless to say, Ashley worked close to 3214012 hours over the weekend and I was there for much of that. Sorry to keep you guys waiting but again... WOOHOO:)
Now to frames! I had several questions about my frames I used on this wall here.
This is a "pre-blog" project I have never shared. I was creating a wall of pictures and wanted to alter my frames to coordinate and help it flow. I purchased all of my frames at Big Lots for under $20 but you can also find great cheapos at Wal-Mart, Dollar Tree and Hobby Lobby. I tried to find frames that were very different in style. You start by removing the insides of your frame like this.
These are the products I used to create my frames.
First I painted the frame with two coats of the Americana Burnt Umber.
After letting that dry I applied one generous coat of the crackle medium.
After that dries it is time for the top coat. Your top coat will be the color that cracks open and reveals the bottom coat through the cracks. *IMPORTANT* !! When you are applying the top coat you can't paint over where you have already painted. I do one line of paint at a time. If you do go over it, the crackle will not work.
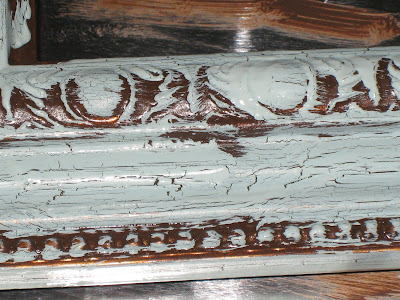
As the top coat drys it will crackle. Make sure to use a good amount of paint on your brush for the top coat.
And all finished up...
At this point you can put your glass back in and add a cute picture...
...Or you can also take it one step further. Soon, I will be showing you a super cheap but so chic way to mat your own pictures.
Thanks so much for stopping by! We've missed you guys and I'm glad to get back in the swing of things. Have a great Thursday!!
~Whitney






32 comments:
love it! i have used that same crackle liquid and it just didnt work. but now i know why. i painted more than once with the top coat! silly me! i guess i will be trying it again! thanks for the info! and wahoo! for your little cutie!
LOVE this and PERFECT timing as I was JUST thinking my frames needed a little pick me up!! THANKS!
Love it! I think I found my next project.
Thanks for the info, esp about painting the top coat with a once over! Congrats to your little one ~ she is adorable.
Love the blue! I've used that product and it does give a great finish.
Very cute! Great color too. I just posted a frame (and Gorilla Glue) project and I am hosting a linky party. Please join me :)
I think that princess needs a tutu. :) Very nice tutorial.
Love it! Can't wait to try it!
Congrats on the championship win!! I was a competitive dancer and I can relate to the excitement of a championship competition!!
Thanks for the great tutorial. It was great to see it explained!
Ok, what color blue did you use? Love these!
I just painted a pair of lamps that exact aqua color. Love it! The frames look great.
By the way, congrats to the champ!
Really nice. Thanks for explaining how it's done.
What a sweetheart your daughter is! Very exciting for her, I'm sure!
I'll have to try that crackle finish again because I must have been doing it all wrong. I think I gave up and just threw mine away last time. Thanks for the tip!
Very cute! Look forward to the mat tutorial!
Your daughter is adorable! Congrats on winning Nationals! I cheered and coached for an All-Star gym in Florida for 7 years and I miss it so much since I've moved. Best of luck on the rest of the season! Any comps in FL?
I already have the stuff to make one of these frames. I should give it a try. I was wonedring where you guys were! LOL Love the frames and congrats on winning the Nationals! My daughter used to be in cheer and I am thinking about getting her in it again.
Thank you!!! I painted my living room/entry this weekend and when I saw this idea I got really happy :) Now I'm going to move all my crosses and frames together like you did. I can't wait to crackle the frames.
And Congrats on the championship. She is ADORABLE!!!
Oh my goodness...I just had some frames made this week and stained part of them yesterday...I was deciding what design i wanted to do with them and then i got your updated post!! Yay...i have crackle stuff in my craft closet!! I've attempted crackle once before with acceptable success, so thanks for the tutorial...my frames are sure to turn out great now!!!!
Very nice! Thanks for the tutorial! :)
Thanks for really showing us how to do this and for all the tips of what to look out for. I bought some crackle finish but have been afraid to try them out. You have made me brave!!!
Love this idea... I'm going to have to try this.
Yup! I'll be doing this this summer!
Cute frames! Thanks for the tutorial! And I feel ya on the weekends of competitions! My daughter has been in competitive dance for 4 years now and even competed last year with her first solo! Congrats on the Nationals!
http://stepherb.blogspot.com/2009/03/my-babys-first-solo.html
Love them! But then what don't I love on your blog?! =)
Yay, I'm so glad you girlies are back! I didn't know what to do with myself;) Congrats to your sisters and your little cutie pie...that is AWESOME! Thanks for the fun frame idea. LOVE IT!
Jennie Esplin @ Cinnaberry Suite
Cute!! Thanks for sharing :) I love the whole wall with all the different crosses..may need to copy this one :)
I love these! I had no idea this look was so easy to do. Thank you!!!
What a good idea. It is a very impressive look.
This is so pretty. i was wondering if it's ok to use the crackle when it's raining out. i've heard that it won't work if you do, but haven't actually tried it. do you know if this is true or not.
What a great job! Super cute and easy to do!
Just GORGEOUS! I have to put this one in my back pocket...I can't wait to find the time to do this! Thanks for sharing!
I...LOVE...YOU! For sharing this post, anyway..LOL
I am not the greatest painter ever and this crackle stuff is going to change my projects, I can feel it!
:)
Post a Comment