Tuesday, August 31, 2010

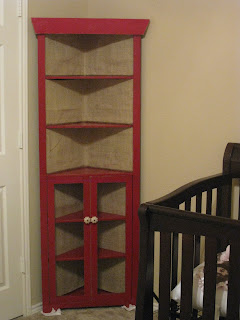
Corner Hutch Re-Revamp

Hey guys!  So, Whitney is having her baby today!  Woohoo!  Happy time here in Texas!  Please keep her family in your prayers! 

I'm sharing another piece of furniture from the nursery today. 
No, it does not look like this now but this is before the first revamp!


Here it is after the first revamp as a new piece in our gameroom.  If you would like the tutorial on this revamp you can go HERE.

I didn't need it in the gameroom anymore and I desperately needed more furniture for the nursery so.....

She got a fresh coat of red paint.  This is the same color that I used on her dresser.  I had it matched to the bedding at Home Depot.  I left the burlap on the back side because I love it!  I also had to change the top molding piece out because it kept the hutch from fitting in this corner.  I just ripped it off and replaced it with a 1x4.

I wanted to match the knobs to the glass knobs I used on the dresser so I purchased these at Hobby Lobby when they were 1/2 off.


Here they are before

and here she is after another makeover.

a few nick nacks...

So there is another small peek at the nursery.  It is coming along and I'll share my progress with you as it happens!

A few things:

Today is the last day for free shipping at The Ribbon Retreat!  The more you save on shipping, the more ribbon you can buy!


Also:  Don't forget about I Made it Without My Hubby party on September 7!  Gorilla Glue will be sending two lucky winners this great prize package!

So, get those projects ready!  We can't wait to see them!!!

~Ashley

Sunday, August 15, 2010

Mexican Pine turned Shabby Chic

So I have been very fortunate not to have to buy any furniture for our new nursery (besides the crib).  I have been transforming funiture we have around the house to match the nursery decor!


This is a dresser my husband had in his office (which is now the nursery).  We've had it for about 8 years...how it has managed to keep off of my 'transform and make better list' I haven't a clue but her time has come!

This hardware was a booger to remove but I succeeded!!!

If you have hardware attached this way, use plyers and a flat head screwdriver to pry the pieces out of the wood.


Yes, I am painting red over carpet....27 weeks pregnant and a heat index of 111 can do crazy things! Not a drop thank goodness:) I used a semi-gloss latex paint by Behr. I just had the paint guy a Home Depot match it to the red in the bedding. It was a perfect match!


I used my 3M sanding block to scuff up every edge and then followed up with Minwax Dark Mahogany stain to add to the aged look!

Now for my favorite part...the hardware!


I found these super cute large glass knobs at Hobby Lobby.  Unfortunately I needed 5 and at $7.50 each I had to wait until they were on sale.  But I did get them 1/2 off after waiting patiently:)


Before...


After!

Thanks so much for stopping by! 
~Ashley

Please check out all of the fabulous deals at one of our favorite online shops...


post signature

Thursday, August 12, 2010

Feature Time!!! And Winners.....

Hey girls!! What a great month of projects we have!!  We loved looking through all of them! Want to see a few of our favs??  Here they are...

We loved Cinnaberry Suite's menu board!!


How cute are these placemat pillows over at Mine for the Making!!


We are both very pregnant so I Heart Naptime's Oreo Ice Cream Cake stole our hearts... I'm making one SOON!


Check out Sweet Nothing's headboard from an old door!  I want her bedding too :)


Oh Twice Lovely... We love your furniture redos!!


Check out the "Target" bookshelf over at Hand Me Down House!!


Loved this bench from a couch at Paper Flower Drive!!


Weren't those fun!! Thanks so much to everyone who linked up!!  I have to apologize for the janky font on the linky party... Not sure what happened but it should look better next month!

Now for some winners....

Thanks again to the Freckled Flower for sponsoring this month's party!!

The winners were randomly drawn from everyone that entered and added our button on their post or sidebar! 

The winner of the tutu set is....

#39 ~ Patricia Rae Designs

The winner of the earrings is....

#19 ~ Kirk Krew 

Congratulations Girlies!! Thanks for linking up and adding the button... I had to randomly generate 7 times to get two gals that added the button :)!  Send us your contact info and we will get it over to the Freckled Flower!!  Have a great day!!  Our next party will be on September 7th!


post signature

Saturday, August 7, 2010

I Made it Without My Hubby!!

Happy Saturday!!

It's that time again....


We want to see any and ALL projects, crafts and revamps you gals have done this month without the help of your hubby!!

We have another great giveaway for 2 of you lucky ladies!! This month our party is being sponsored by the Freckled Flower Shop!


One winner will receive this super cute set...


It's a zebra and hot pink double layer tutu with matching wings... tootoo cute!!!

And another winner will receive these...


A pair of black blooming flower earrings!! LOVE these!!

Make sure you go check out the Freckled Flower Shop for more super cute goodies!!

As always we will highlight a few of our favorites and we will randomly draw from all participants for our 2 winners.  You must add our party button on your post of sidebar to be entered in the giveaway.  You can find that over in our sidebar!

Can't wait to see all you girls have in store....  Click the blue button below to link up!!


post signature

Thursday, August 5, 2010

Ballard Inspired Cuties!

Hey guys!! Sorry about the absence between posts... Something about being 9 months pregnant, 106 degrees outside and having all my kids at home slows me down just a bit :) I have been getting projects done though and I wanted to share this one with you.  I recently got the new Ballard catalog online and saw this super cute picture...


I loved everything about it.  I love the bracket shelves, all that white and I love those topiaries.  My project started just recreating the shelves and led to a slightly different ending.  The very first thing I needed was the brackets.  I went to Hobby Lobby to get some metal brackets I had planned on painting white.  They also have a great selection of wood and resin corbels that would be cute painted white too.  I then remembered these great corbels I purchased on my trip to Round Top last year.


There was a really sweet couple there who sell mantels and corbels they make from old chippy wood and tin.  I scored two of these for $8 a piece!  I decided to use them instead of the metal brackets.  My next stop was Michael's to find something to put on top of my shelves.  I wanted the topiaries from Ballard but with a $60 price tag I said no thanks!  While at Michael's I was lucky enough to stumble upon these!!


Yes... That's right! Those are boxwood topiaries... Yeah!  These were buy one get one free so I got 2 for $12! I loved them but was not loving the pots.  I had a plan though.

My first step was to cut some wood for the top of my shelves.  I used cheap 1x8 I got from Lowe's for under $5.  I used my miter saw to cut two 6" pieces.


Here they are just before getting a coat of our fav... Rust-Oleum Painter's Touch in Heirloom White!


Here it is dry!


I penciled off center on the bottom of the wood and used another favorite product for the next part.  I used Gorilla Glue Epoxy.


I just mixed the epoxy using the directions on the package and applied it to the bottom of the wood shelf.


Then I just attached the wood corbels to the shelf piece and let them dry.

While those were drying I started working on my topiaries.  I purchased a roll of jute twine from Hobby Lobby.


I then pulled out my new hot glue gun because I had yet another one go see Jesus.


I started at the bottom of the pot and wrapped the twine as I went up.  Every couple of inches I would add a drop of hot glue.


A few minutes later....


When I made it to the top I tied a cute little bow and I was set!


My final step was to hang my new cuties and take pictures for you guys! Here is how they turned out...


What do you think??  I love them!  I must thank Ballard for the super cute idea and bad prices to inspire me to make my own.  I'm off to browse their catalog a bit more!  Have a great Thursday and we will be back soon!

Don't forget! I Made it Without My Hubby is in two days! Get those projects ready!!

~Whitney


post signature