I'm back to share the latest progress on my storage wall. If you have missed the last two tutorials you can visit Part 1 and Part 2. I found the plans for this project on Ana's blog Knock Off Wood. Ana provides FREE plans for knock off furniture (i.e. Pottery Barn and Restoration Hardware) so you can dress your house for less! Go check out her site!...you'll be addicted!
So, this is Part 3 of this system and I chose to tackle the cubbies this go 'round (see Ana's plans for the cubbies). If you are wondering what Part 4 will be...it's not featured in this picture. Ana designed her own plans for a media bridge to go over the TV, so that will be my final piece to this puzzle. Believe it or not, I am a little sad to see this project coming to an end, however I'm sure I will no longer be feeling that way once it's time to paint:/
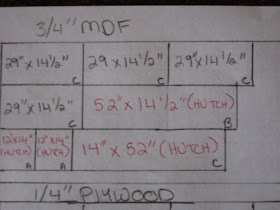
I started by drawing out plans for the cut layouts. Although I am only doing the cubbies this time, I went ahead and added the cuts for the media bridge to maximize the amount of cuts per sheet (those cuts are in red). This will also make it easier for the guys that cut your boards at Home Depot. The drawing above shows that I needed three 8' sheets of MDF at 3/4" thick and one 8' sheet of plywood at 1/4" thick.
3/4" MDF
3/4" MDF
3/4" MDF
1/4" plywood
I gave these layouts to the guys at Home Depot and they cut all of the pieces in about 30 minutes. Price per cut varies per store. My local Home Depot offers the first two cuts free and then charges $0.25 per additional cut. They were wonderful and never charged me for a cut!
Now for the building!!!
Make sure to label each cut. This will save you time and headache while you are building:)
I always mark off a line to follow when I am predrilling so that the screw will go through the very center of the board on the other side. MDF is soft and if you get too close to one side it will raise up or split through (if this happens, no worries, just sand with 120 grit paper, fill with wood putty, sand and find another point to predrill).
Mark off all of your measurements before predrilling. In this picture I am showing how I marked off where this board is to be placed.
I always use three fingers to measure how far away from the edge I should start predrilling. If you get too close to the edge it will split.
ALWAYS predrill with MDF!!! It is very easy. Pick the right circumference for your drill bit (just a tad smaller than the screws you will use) and drill all the way in and pull back out while still pushing on the trigger.
After predrilling run a generous amount of Gorilla Glue Wood Glue down the edge of the board and put back in place.
Follow up with the screw. I use these Deck Mate screws and they work great.
After the first step.
Second step (added the top).
This is after the third step. It was a little tricky so I'll show you my steps.
Ana says that wood glue is very important on this step so I added it here too.
I marked off where I needed to predrill. This is the top shelf that I am securing and my drill would not fit between the bottom and middle shelf so I drilled one screw at the front and one at the back at a slight angle. No problems.
Now for the trim. Add the wood glue.
Secure with nails per Ana's plans. I set the cubby upside down to hammer the nails in. These nails worked just fine.
Using the same nails, I hammered the back piece into place.
I just couldn't wait to put it in place!
I have only finished one of the cubbies but I wanted to share it with you! I will be back with updated pictures after I finish the other three! I am still leaning towards adding drawers to the bottom outside bases but I won't make the final decision until it's done. Well, I'm off to finish the other cubbies! I hope you all have a great weekend!
~Ashley


